Setup
Installation
1. CleverPush account
- Create A CleverPush Account if you do not have one
- You need your CleverPush Channel ID, available in
Channels>App Push>Implementation>Channel IDin the CleverPush Developer console. - You need a Mac with the latest version of Xcode installed.
2. SDK Setup
CocoaPods Installation
Add CleverPush to your Podfile:
pod 'CleverPush', '~> 1.34.38'
Swift Package Manager Setup
(not needed if you use CocoaPods)
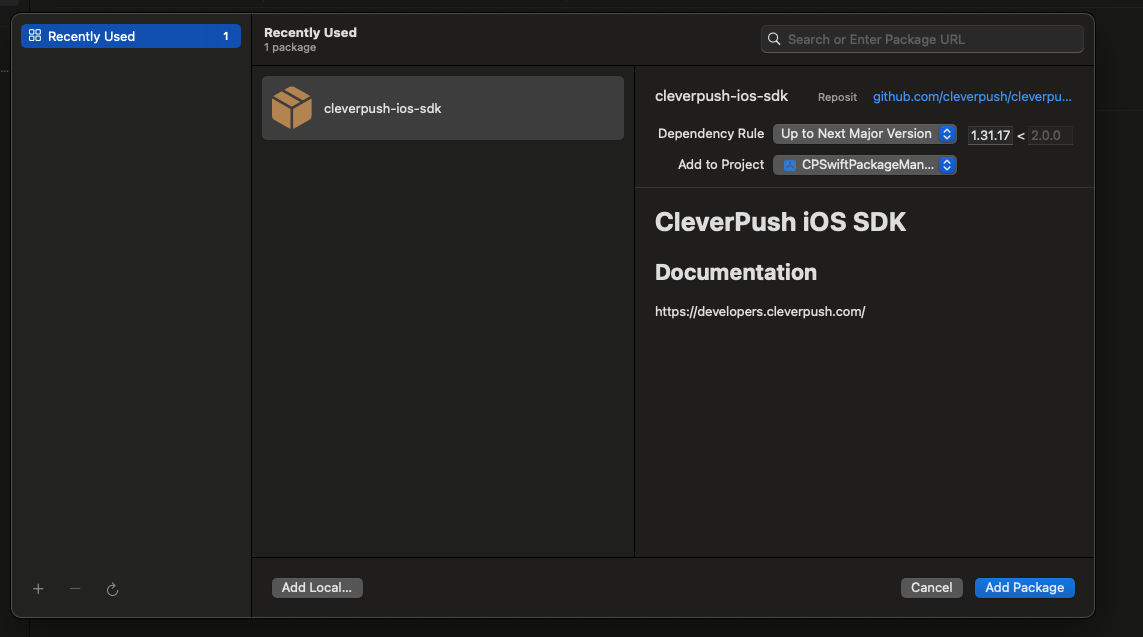
Select your Project > Package Dependencies > + button.

Enter Package URL & Click Add Package:
https://github.com/cleverpush/cleverpush-ios-sdk.git
Make sure Dependency Rule is set to Up to Next Major Version [latest version].
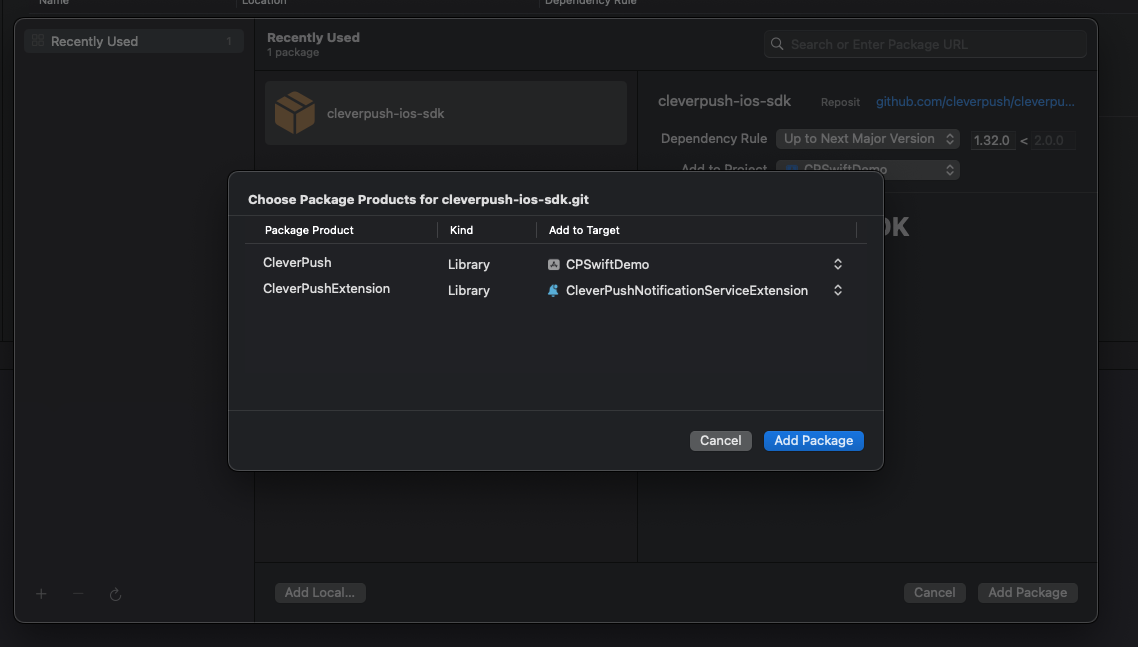
Click Add Package.

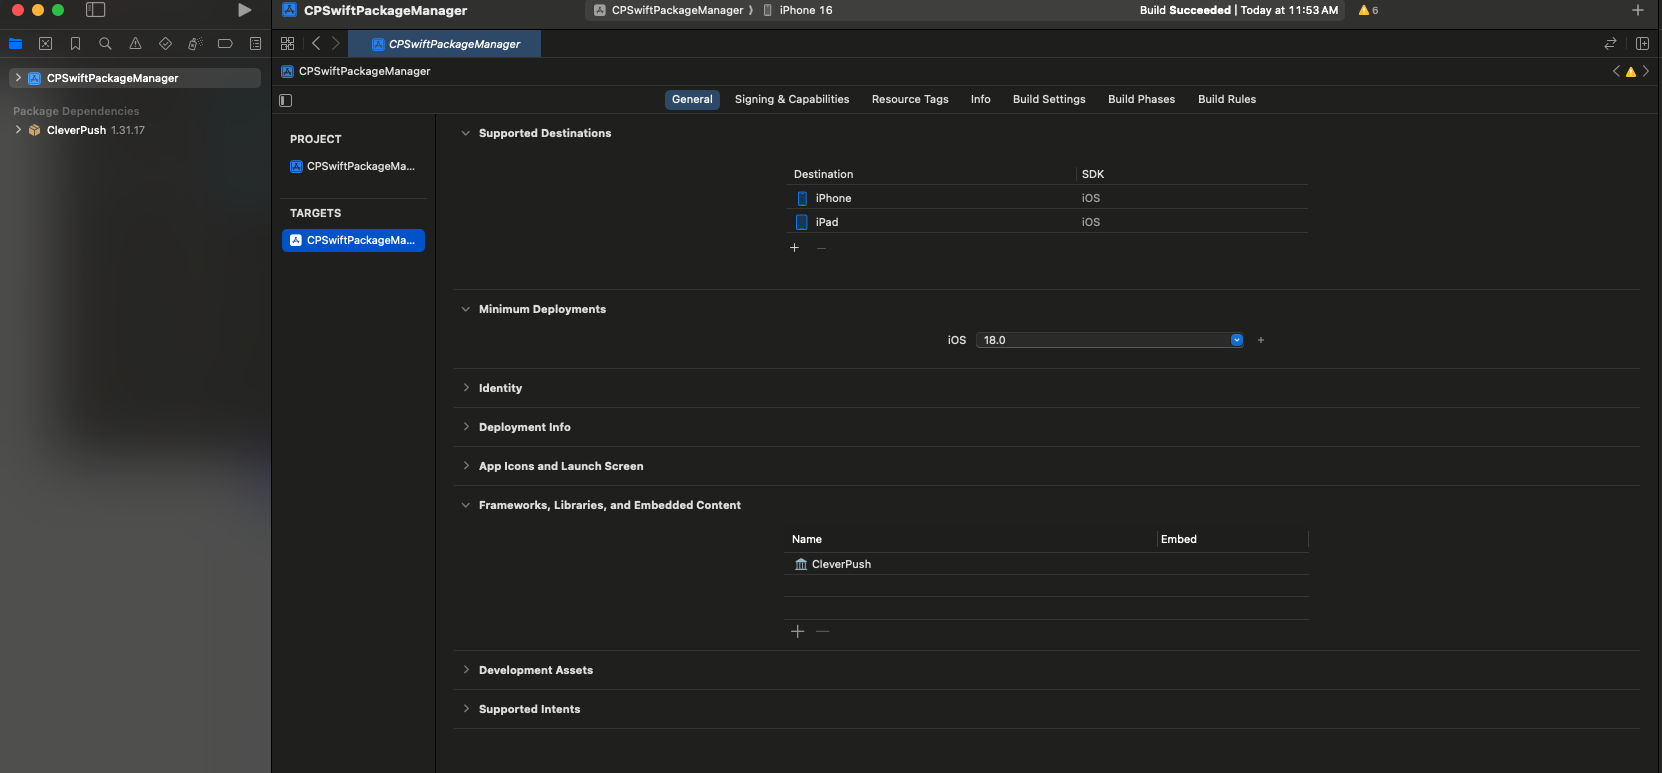
Select your Application Target > General > Frameworks, Libraries, and Embedded Content.
Check to ensure the required CleverPushFramework and any optionally selected libraries have been added.
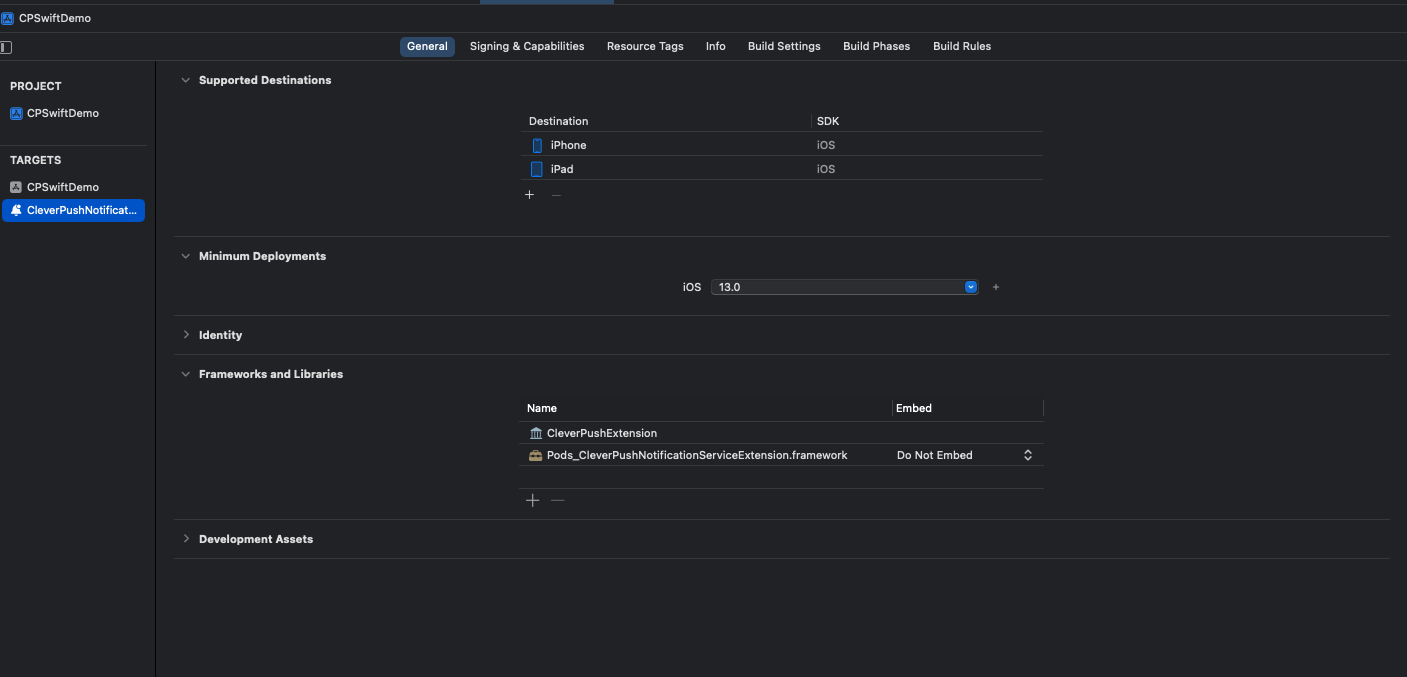
If you have a Notification Service Extension or Content Extension, repeat the above steps for those targets to ensure the CleverPushExtension is included.

Carthage Setup
(not needed if you use CocoaPods):
Make sure you have Carthage installed before you begin.
Create a Cartfile in the same folder as your project.
In your cartfile, include the CleverPush iOS SDK:
github "cleverpush/cleverpush-ios-sdk"Navigate to the cartfile directory and run the following command in the terminal.
carthage update --use-xcframeworksWhen the command is executed correctly, a folder named Carthage is created. The Cleverpush Framework will be generated in the Carthage > Build folder.
Simply include the Cleverpush framework in your project.
Manual Setup
(not needed if you use CocoaPods):
- Download the SDK release from https://github.com/cleverpush/cleverpush-ios-sdk/releases
- Drop and drag
CleverPush/Framework/CleverPush.frameworkinto your Xcode project and check the copy option. - Add
SystemConfiguration,UIKit,UserNotifications,WebKit,JavaScriptCore,ImageIOandMobileCoreServicesto your frameworks. - Continue to step 3. If you are at step 4 and 5, repeat these steps for the Service Extension and for the Content Extension
3. Enable the required capabilities
- Go to your root project
Targets>Signing & Capabilities>Add Capabilities by clicking the "+ Capability" button - Select "Push Notifications" from the list of the capabilities.
- Select "Background Modes" from the list of the capabilities and tick on the option of "Remote notifications"
4. Add Notification Service Extension
This is required for correctly tracking notification deliveries and for displaying big images or videos in notifications.
Select
File>New>Targetin XcodeChoose
Notification Service Extensionand pressNextEnter
CleverPushNotificationServiceExtensionas Product Name, chooseObjective-Cas language and pressFinishPress
Activateon the next promptIf you use CocoaPods: Add the following at the bottom of your Project's Podfile.
target 'CleverPushNotificationServiceExtension' do
    use_frameworks!

    pod 'CleverPush/CleverPushExtension'
end
If you use CocoaPods: Run
pod installImportant: In the target’s Build Phases > Embed App Extensions section, make sure the "Copy only when installing" checkbox is unchecked, otherwise, the service extension won’t run.
5. Add Notification Content Extension (optional)
This is only required for displaying custom notification contents (e.g. Carousel Notifications). Most use cases do not require this extension.
Select
File>New>Targetin XcodeChoose
Notification Content Extensionand pressNextEnter
CleverPushNotificationContentExtensionas Product Name, chooseObjective-Cas language and pressFinishPress
Activateon the next promptIf you use CocoaPods: Add the following at the bottom of your Project's Podfile
target 'CleverPushNotificationContentExtension' do
    use_frameworks!

    pod 'CleverPush'
end
If you use CocoaPods: Run
pod install
6. Replace Notification Service Extension source code.
Open CleverPushNotificationServiceExtension/NotificationService.m and replace the whole content with the following:
import UserNotifications
import CleverPushExtension

class NotificationService: UNNotificationServiceExtension {

    var contentHandler: ((UNNotificationContent) -> Void)?
    var receivedRequest: UNNotificationRequest!
    var bestAttemptContent: UNMutableNotificationContent?

    override func didReceive(_ request: UNNotificationRequest, withContentHandler contentHandler: @escaping (UNNotificationContent) -> Void) {
        self.receivedRequest = request;
        self.contentHandler = contentHandler
        bestAttemptContent = (request.content.mutableCopy() as? UNMutableNotificationContent)

        if let bestAttemptContent = bestAttemptContent {
            CleverPushExtension.didReceiveNotificationExtensionRequest(self.receivedRequest, with: self.bestAttemptContent)
            contentHandler(bestAttemptContent)
        }
    }

    override func serviceExtensionTimeWillExpire() {
        if let contentHandler = contentHandler, let bestAttemptContent =  bestAttemptContent {
            CleverPushExtension.serviceExtensionTimeWillExpireRequest(self.receivedRequest, with: self.bestAttemptContent)
            contentHandler(bestAttemptContent)
        }
    }

}
#import "CleverPushExtension/CleverPushExtension.h"
#import "NotificationService.h"

@interface NotificationService ()

@property (nonatomic, strong) void (^contentHandler)(UNNotificationContent *contentToDeliver);
@property (nonatomic, strong) UNNotificationRequest *receivedRequest;
@property (nonatomic, strong) UNMutableNotificationContent *bestAttemptContent;

@end

@implementation NotificationService

- (void)didReceiveNotificationRequest:(UNNotificationRequest *)request withContentHandler:(void (^)(UNNotificationContent * _Nonnull))contentHandler {
    self.receivedRequest = request;
    self.contentHandler = contentHandler;
    self.bestAttemptContent = [request.content mutableCopy];

    [CleverPushExtension didReceiveNotificationExtensionRequest:self.receivedRequest withMutableNotificationContent:self.bestAttemptContent];

    self.contentHandler(self.bestAttemptContent);
}

- (void)serviceExtensionTimeWillExpire {
    [CleverPushExtension serviceExtensionTimeWillExpireRequest:self.receivedRequest withMutableNotificationContent:self.bestAttemptContent];

    self.contentHandler(self.bestAttemptContent);
}

@end
7. Replace Notification Content Extension source code
Only required if Notification Content Extension has been added.
Open CleverPushNotificationContentExtension/NotificationViewController.h and replace the whole content with the following:
import UIKit
import CleverPush

class NotificationViewController: CPNotificationViewController {

}
#import <UIKit/UIKit.h>
#import <CleverPush/CleverPush.h>

@interface NotificationViewController : CPNotificationViewController

@end
Open CleverPushNotificationContentExtension/NotificationViewController.m and replace the whole content with the following:
import UIKit
import UserNotifications
import UserNotificationsUI

class NotificationViewController: CPNotificationViewController, UNNotificationContentExtension {

    override func viewDidLoad() {
        super.viewDidLoad()
    }

    override func viewDidAppear(_ animated: Bool) {
        super.viewDidAppear(animated)
    }

    func didReceive(_ notification: UNNotification) {
        cleverpushDidReceiveNotification(notification)
    }

    func didReceive(_ response: UNNotificationResponse, completionHandler completion: @escaping (UNNotificationContentExtensionResponseOption) -> Void) {
        cleverpushDidReceiveNotificationResponse(response, completionHandler: completion)
    }
}
#import "NotificationViewController.h"
#import <UserNotifications/UserNotifications.h>
#import <UserNotificationsUI/UserNotificationsUI.h>

@interface NotificationViewController () <UNNotificationContentExtension>

@end

@implementation NotificationViewController

- (void)viewDidLoad {
    [super viewDidLoad];
}

- (void)viewDidAppear:(BOOL)animated {
    [super viewDidAppear:animated];
}

- (void)didReceiveNotification:(UNNotification *)notification {
    [self cleverpushDidReceiveNotification:notification];
}

- (void)didReceiveNotificationResponse:(UNNotificationResponse *)response completionHandler:(void (^)(UNNotificationContentExtensionResponseOption))completion {
    [self cleverpushDidReceiveNotificationResponse:response completionHandler:completion];
}

@end
Open CleverPushNotificationContentExtension/Info.plist and replace the whole content with the following:
<?xml version="1.0" encoding="UTF-8"?>
<!DOCTYPE plist PUBLIC "-//Apple//DTD PLIST 1.0//EN" "http://www.apple.com/DTDs/PropertyList-1.0.dtd">
<plist version="1.0">
<dict>
    <key>CFBundleDevelopmentRegion</key>
    <string>$(DEVELOPMENT_LANGUAGE)</string>
    <key>CFBundleDisplayName</key>
    <string>CleverPushNotificationContentExtension</string>
    <key>CFBundleExecutable</key>
    <string>$(EXECUTABLE_NAME)</string>
    <key>CFBundleIdentifier</key>
    <string>$(PRODUCT_BUNDLE_IDENTIFIER)</string>
    <key>CFBundleInfoDictionaryVersion</key>
    <string>6.0</string>
    <key>CFBundleName</key>
    <string>$(PRODUCT_NAME)</string>
    <key>CFBundlePackageType</key>
    <string>$(PRODUCT_BUNDLE_PACKAGE_TYPE)</string>
    <key>CFBundleShortVersionString</key>
    <string>1.0</string>
    <key>CFBundleVersion</key>
    <string>1</string>
    <key>NSExtension</key>
    <dict>
        <key>NSExtensionAttributes</key>
        <dict>
            <key>UNNotificationExtensionCategory</key>
            <array>
                <string>carousel</string>
            </array>
            <key>UNNotificationExtensionDefaultContentHidden</key>
            <false/>
            <key>UNNotificationExtensionInitialContentSizeRatio</key>
            <real>0.5</real>
        </dict>
        <key>NSExtensionPrincipalClass</key>
        <string>NotificationViewController</string>
        <key>NSExtensionPointIdentifier</key>
        <string>com.apple.usernotifications.content-extension</string>
    </dict>
</dict>
</plist>
8. Initialize the SDK in your AppDelegate
import UIKit
import CleverPush
@main
class AppDelegate: UIResponder, UIApplicationDelegate {
    func application(_ application: UIApplication, didFinishLaunchingWithOptions launchOptions: [UIApplication.LaunchOptionsKey: Any]?) -> Bool {

        // Make sure to insert your CleverPush channelId
        CleverPush.initWithLaunchOptions(launchOptions, channelId: "YOUR_CHANNEL_ID_HERE")

        // You can also leave out the Channel ID. You will need to specify the App's Bundle Identifier in the CleverPush Channel Settings.
        // CleverPush.initWithLaunchOptions(launchOptions);

        return true
    }
}
#import <CleverPush/CleverPush.h>

@implementation AppDelegate

- (BOOL)application:(UIApplication *)application didFinishLaunchingWithOptions:(NSDictionary *)launchOptions {
// ...

// Make sure to insert your CleverPush channelId
[CleverPush initWithLaunchOptions:launchOptions channelId:@"INSERT-YOUR-CHANNEL-ID-HERE"];

// You can also leave out the Channel ID. You will need to specify the App's Bundle Identifier in the CleverPush Channel Settings.
// [CleverPush initWithLaunchOptions:launchOptions];

return YES;
}

@end
Optionally, you can also add your notification opened callback in your didFinishLaunchingWithOptions or the subscribed callback with the subscription ID like this:
// ...

func application(_ application: UIApplication, didFinishLaunchingWithOptions launchOptions: [UIApplication.LaunchOptionsKey: Any]?) -> Bool {
  // ...
  CleverPush.initWithLaunchOptions(launchOptions,
        channelId: "YOUR_CHANNEL_ID_HERE",
        handleNotificationReceived: { (result) in
            print("Received Notification with URL: " + (result!.notification?.url)!)
     }, handleNotificationOpened: { (result) in
            print("Opened Notification with URL: " + (result!.notification?.url)!)
     }, handleSubscribed: { subscriptionId in
            print("Subscribed to CleverPush with ID: \(subscriptionId ?? "")")
     }, autoRegister: true)

  return true
}
// ...

[CleverPush initWithLaunchOptions:launchOptions
        channelId:@"YOUR_CHANNEL_ID_HERE"
        handleNotificationReceived:^(CPNotificationReceivedResult *result) {
            NSLog(@"Received Notification with URL: %@", [result.notification valueForKey:@"url"]);
     }  handleNotificationOpened:^(CPNotificationOpenedResult *result) {
            NSLog(@"Opened Notification with URL: %@", [result.notification valueForKey:@"url"]);
     }  handleSubscribed:^(NSString *subscriptionId) {
            NSLog(@"Subscribed to CleverPush with ID: %@", subscriptionId);
     } autoRegister:YES];
Please note that autoRegister is turned to true in the above example. It means that the CleverPush SDK will automatically try to subscribe the user on the first launch of the app. If you call unsubscribe() the SDK will not automatically try to subscribe again.
You can add a handleInitialized callback
The handleInitialized callback is invoked when the CleverPush SDK initialization process completes. It provides information about whether the initialization was successful or if it failed, allowing developers to respond accordingly.
success: A boolean value indicating whether the initialization was successful (TRUE) or failed (FALSE).failureMessage: A nullable string containing the error message if initialization failed. This parameter will be nil if initialization was successful.
[CleverPush initWithLaunchOptions:launchOptions
            channelId:@"YOUR_CHANNEL_ID_HERE"
            handleNotificationReceived:^(CPNotificationReceivedResult * _Nullable result) {
                    NSLog(@"Recieved Notification with URL: %@", [result.notification valueForKey:@"url"]);
        }   handleNotificationOpened:^(CPNotificationOpenedResult * _Nullable result) {
                    NSLog(@"Opened Notification with URL: %@", [result.notification valueForKey:@"url"]);
        }   handleSubscribed:^(NSString * _Nullable result) {
                    NSLog(@"Subscribed to CleverPush with ID: %@", result);
        }   autoRegister:YES
            handleInitialized:^(BOOL success, NSString * _Nullable failureMessage) {
                    NSLog(@"init success = %s", success ? "TRUE" : "FALSE");
                    NSLog(@"init failure = %@", failureMessage);
}];
CleverPush.initWithLaunchOptions(launchOptions, channelId: "YOUR_CHANNEL_ID_HERE", handleNotificationReceived: { result in
            print("Receieved Notification URL: \(result?.notification?.url)")
        }, handleNotificationOpened: { result in
            print("Opened Notification URL: \(result?.notification?.url)")
        }, handleSubscribed: { result in
            print("Subscription ID: \(subscriptionId)")
        }, autoRegister: true) { success, failureMessage in
            print("init success = %s", success ? "TRUE" : "FALSE")
            print("init failure = %@", failureMessage)
}
9. Create your iOS Auth Key
See the section below: How to Create an iOS APNS Auth Key
10. Add AppGroup (optional but recommended)
This is required for getting the received notifications via the getNotifications method and also for automatic Badge Counting (i.e. when using setIncrementBadge(true)).
- Select your main application Target in Xcode
- Go to
Capabilitiesand activateApp Groups - Create a new App Group with the exact following scheme:
group.YOUR.BUNDLE.ID.cleverpush(replaceYOUR.BUNDLE.IDwith your application's bundle identifier). - Enable the created App Group by checking the checkbox next to it
- Select the
CleverPushNotificationServiceExtensiontarget and also enable the created App Group underCapabilities
Managing Multiple Targets in Your App
When developing an application with multiple targets (such as Stage, Live, Master, etc.), Here are the necessary steps and configurations:
1. Service Extensions
- Each target should have its own service extension to handle notifications and functionalities independently.
- Add a new target for each service extension in your Xcode project.
- Ensure that each service extension is configured to handle notifications specific to its environment.
2. App Groups
- Set up separate App Groups for each target to enable communication between your app and its service extensions.
- Create distinct App Groups for Stage, Live, and Master targets in your project settings.
- Update the entitlements files for each target to include the corresponding App Group.
- Ensure that the logic in your app and extensions uses the correct App Group for data storage and sharing.
3. Entitlements
- Confirm that the entitlements for each target are appropriately configured, including permissions for push notifications and shared capabilities.
- Review and customize the entitlements file for each target.
- Add capabilities relevant to the environment (e.g., Push Notifications, App Groups).
4. Configuration Settings
- Each target may require different configuration settings such as Channel ID.
5. Info.plist Files
- Each target should have its own Info.plist file with environment-specific configurations.
Custom sounds
iOS supports aiff, wav and caf audio files with a maximum length of 30 seconds.
- Add the sound file(s) to the Xcode project root and make sure "Add to targets" is selected when adding the files.
- When sending a notification you can enter the filename (with extension) in the field "Sound" in the advanced settings.
- If you send notifications via the API you can use the parameter "soundFilename".

Badge Counts
Disable automatic clearing of badge count when opening a notification. Enabled by default. Please note that with the default behaviour (setting badge count to zero) iOS will automatically clear all notifications in the Notification Center.
Required setup steps:
- Please set up the App Group like described in the Setup section.
- Disable Badge Count in the CleverPush Channel Settings in the "iOS" section. It is not required anymore to send the Badge Count from the backend because the SDK will now handle the Badge Count by itself.
CleverPush.setAutoClearBadge(false)
[CleverPush setAutoClearBadge:NO];
Enable automatic incrementation of badge count. Disabled by default.
CleverPush.incrementBadge = true
[CleverPush setIncrementBadge:YES];
Hiding notifications while in foreground
You can disable the automatic showing of notifcations when the app is in foreground:
CleverPush.setShowNotificationsInForeground(false)
[CleverPush setShowNotificationsInForeground:NO];
Notification permission
By default, the SDK automatically unsubscribes users who have revoked their notification permission in the iOS settings. Sometimes it still makes sense to subscribe those users (e.g. for silent notifications). You can disable this behaviour with this method call (before init). The SDK then also automatically subscribes all users, no matter if they accepted or denied the permission prompt.
CleverPush.setIgnoreDisabledNotificationPermission(true)
[CleverPush setIgnoreDisabledNotificationPermission:YES];
How to Create an iOS APNS Auth Key
If you’d like to send push notifications to your iOS users, you will need to upload either an APNs Push Certificate, or an APNs Auth Key.
We recommend that you create and upload an APNs Auth Key for the following reasons:
No need to re-generate the push certificate every year
One auth key can be used for all your apps – this avoids the complication of maintaining different certificates
When sending push notifications using an APNs Auth Key, we require the following information about your app:
- Auth Key file
- Team ID
- Your app’s bundle ID To create an APNs auth key, follow the steps below.
Visit the Apple developer portal

Click on “Certificates, Identifiers & Profiles”.
Go to Keys from the Left Menu.
Create a new Auth Key by clicking on the “+” button beside the Key.

On the following page, add a Key Name, and select APNs Hit the Continue button.

and save the APNs Key And download.

On this page, you will be able to download your auth key file. Please do not rename this file, and upload it as it is to our dashboard, as shown later below.

Locate and copy your Team ID – click on your name/company name at the top right corner, then select “View Account”.

Copy your Team ID, and head over to the CleverPush dashboard, and navigate to Channels ->Select your channel -> App Push -> iOS
Paste the APNs Key ID which you have downloaded earlier, and paste your Team ID and your app’s bundle ID. Your app’s bundle ID can be found in Xcode.
Also, Mention Store ID if your application is in production mode.

