Methods
Basic Usage
To initialize the CleverPush SDK, use the following method.
CLEVERPUSH_CHANNEL_ID (String): Your unique CleverPush channel ID. This ID is required to link the app with your CleverPush account.
public class MainActivity extends Activity {
  public void onCreate(Bundle savedInstanceState) {
    CleverPush.getInstance(this).init("CLEVERPUSH_CHANNEL_ID");
  }
}
class MainActivity:Activity() {
  fun onCreate(savedInstanceState:Bundle) {
    CleverPush.getInstance(this).init("CLEVERPUSH_CHANNEL_ID")
  }
}
You can add a NotificationReceivedListener and a NotificationOpenedListener and a SubscribedListener
NotificationReceivedListener: A listener that handles the event when a notification is received. The notificationReceived method is triggered with a NotificationOpenedResult object containing the details of the received notification. It fires when notifications have been received.
NotificationOpenedListener: A listener that handles the event when a notification is opened. The notificationOpened method is triggered with a NotificationOpenedResult object containing the details of the opened notification. It fires when notifications have been opened.
SubscribedListener: A listener that handles the event when a user subscribes. The subscribed method is triggered with the subscriptionId. it fires when the user has successfully been subscribed.
public class MainActivity extends Activity {
  public void onCreate(Bundle savedInstanceState) {
    CleverPush.getInstance(this).init(
      "CLEVERPUSH_CHANNEL_ID",
        new NotificationReceivedListener() {
            @Override
            public void notificationReceived(NotificationOpenedResult result) {
              System.out.println("Received CleverPush Notification: " + result.getNotification().getTitle());
            }
        },
        new NotificationOpenedListener() {
            @Override
            public void notificationOpened(NotificationOpenedResult result) {
              System.out.println("Opened CleverPush Notification: " + result.getNotification().getTitle());
            }
        },
        new SubscribedListener() {
            @Override
            public void subscribed(String subscriptionId) {
                System.out.println("CleverPush Subscription ID: " + subscriptionId);
            }
        }
    );
  }
}
class MainActivity:Activity() {
  fun onCreate(savedInstanceState:Bundle) {
    CleverPush.getInstance(this).init(
        "CLEVERPUSH_CHANNEL_ID",
        NotificationReceivedListener { result -> println("Received CleverPush Notification: " + result.notification.title) },
        NotificationOpenedListener { result -> println("Opened CleverPush Notification: " + result.notification.title) },
    ) { subscriptionId -> println("CleverPush Subscription ID: $subscriptionId") }
  }
}
You can set autoRegister.
autoRegister: The autoRegister parameter controls whether the CleverPush SDK will automatically attempt to subscribe the user upon the first launch of the app. In the below example, autoRegister is set to true. This means that the CleverPush SDK will automatically try to subscribe the user when they first launch the app. If you later call unsubscribe(), the SDK will not automatically try to subscribe the user again. You would need to call subscribe() manually to resubscribe the user.
By default, the autoRegister parameter in the SDK is set to true. This ensures that new users are automatically subscribed unless explicitly specified otherwise.
To prevent automatic subscribing on the first launch, set autoRegister to false in the initialization method. This allows you to control the subscription process manually.
public class MainActivity extends Activity {
  public void onCreate(Bundle savedInstanceState) {
    CleverPush.getInstance(this).init(
      "CLEVERPUSH_CHANNEL_ID",
        new NotificationReceivedListener() {
            @Override
            public void notificationReceived(NotificationOpenedResult result) {
              System.out.println("Received CleverPush Notification: " + result.getNotification().getTitle());
            }
        },
        new NotificationOpenedListener() {
            @Override
            public void notificationOpened(NotificationOpenedResult result) {
              System.out.println("Opened CleverPush Notification: " + result.getNotification().getTitle());
            }
        },
        new SubscribedListener() {
            @Override
            public void subscribed(String subscriptionId) {
                System.out.println("CleverPush Subscription ID: " + subscriptionId);
            }
        },
        true // autoRegister: You can set this to false to prevent automatic subscribing on the first launch
    );
  }
}
class MainActivity:Activity() {
  fun onCreate(savedInstanceState:Bundle) {
    CleverPush.getInstance(this).init(
        "CLEVERPUSH_CHANNEL_ID",
        NotificationReceivedListener { result -> println("Received CleverPush Notification: " + result.notification.title) },
        NotificationOpenedListener { result -> println("Opened CleverPush Notification: " + result.notification.title) },
        { subscriptionId -> println("CleverPush Subscription ID: $subscriptionId") },
        true // autoRegister: You can set this to false to prevent automatic subscribing on the first launch
    )
  }
}
You can add a InitializeListener
The InitializeListener handles the initialization status of the CleverPush SDK. It provides methods that are called at different stages of the initialization process, allowing developers to respond accordingly. Can get notified if the initialization was successful or if it failed,
onInitialized(): This method is called when the initialization process starts. Logs that the initialization process has started.
onInitializationSuccess(): This optional method is called when the initialization is successful. You can override this method to handle the initialization success. Logs that the initialization was successful.
onInitializationFailure(Throwable throwable): This optional method is called when the initialization fails. You can override this method to handle the initialization failure. Logs the error message and details if the initialization fails.
public class MainActivity extends Activity {
  public void onCreate(Bundle savedInstanceState) {
      CleverPush.getInstance(this).init(
        "CLEVERPUSH_CHANNEL_ID",
        new NotificationReceivedListener() {
          @Override
          public void notificationReceived(NotificationOpenedResult result) {
            System.out.println("Received CleverPush Notification: " + result.getNotification().getTitle());
          }
        },
        new NotificationOpenedListener() {
          @Override
          public void notificationOpened(NotificationOpenedResult result) {
            System.out.println("Opened CleverPush Notification: " + result.getNotification().getUrl());
          }
        },
        new SubscribedListener() {
          @Override
          public void subscribed(String subscriptionId) {
            System.out.println("CleverPush Subscription ID: " + subscriptionId);
          }
        },
        true, // autoRegister: You can set this to false to prevent automatic subscribing on the first launch
        new InitializeListener() {
          @Override
          public void onInitialized() {
            Log.d("CleverPush", "CleverPush InitializeListener's default method Initialized");
          }

          @Override
          public void onInitializationSuccess() {
            InitializeListener.super.onInitializationSuccess();
            Log.d("CleverPush", "CleverPush Initialization Successful");
          }

          @Override
          public void onInitializationFailure(Throwable throwable) {
            InitializeListener.super.onInitializationFailure(throwable);
            Log.e("CleverPush", "CleverPush Initialization Failed: " + throwable.getMessage(), throwable);
          }
        }
    );
  }
}
class MainActivity:Activity() {
  fun onCreate(savedInstanceState:Bundle) {
    CleverPush.getInstance(this).init(
        "CLEVERPUSH_CHANNEL_ID",
        NotificationReceivedListener { result -> println("Received CleverPush Notification: " + result.notification.title) },
        NotificationOpenedListener { result -> println("Opened CleverPush Notification: " + result.notification.url) },
        { subscriptionId -> println("CleverPush Subscription ID: $subscriptionId") },
        true, // autoRegister: You can set this to false to prevent automatic subscribing on the first launch
        object : InitializeListener {
            override fun onInitialized() {
                println("CleverPush InitializeListener's default method Initialized")
            }

            override fun onInitializationSuccess() {
                super<InitializeListener>.onInitializationSuccess()
                println("CleverPush Initialization Successful")
            }

            override fun onInitializationFailure(throwable: Throwable) {
                super<InitializeListener>.onInitializationFailure(throwable)
                println("CleverPush Initialization Failed: " + throwable.message)
            }
        }
    )
  }
}
Instead of a NotificationReceivedListener you could also use a NotificationReceivedCallbackListener. This way you can dynamically control if you want to show a notification when the app is running in foreground:
CleverPush.getInstance(this).init("CLEVERPUSH_CHANNEL_ID", new NotificationReceivedCallbackListener() {
   @Override
   public boolean notificationReceivedCallback(NotificationOpenedResult notificationOpenedResult) {
      boolean showNotification = true;
      return showNotification;
   }
}, ...);
CleverPush.getInstance(this).init("XXXXXXX", object:NotificationReceivedCallbackListener() {
fun notificationReceivedCallback(notificationOpenedResult:NotificationOpenedResult):Boolean {
   val showNotification = true
   return showNotification
}
}, ...)
Notification permission
Checks whether notifications are currently enabled for the user.
// Returns true if notifications are enabled for the app
boolean isNotificationsEnabled = CleverPush.getInstance(this).areNotificationsEnabled();
// Returns true if notifications are enabled for the app
val isNotificationsEnabled = CleverPush.getInstance(this).areNotificationsEnabled()
By default, the SDK automatically unsubscribes users who have revoked their notification permission in the system settings. The default value of ignoreDisabledNotificationPermission is false.
Set it to true to keep users subscribed even if notifications are disabled. In some cases (for example, silent notifications), it may still make sense to keep these users subscribed.
You can disable this behavior using the following method.
This must be called before initializing the SDK.
// Ignore disabled notification permission and keep users subscribed
CleverPush.getInstance(this).setIgnoreDisabledNotificationPermission(true);
// Ignore disabled notification permission and keep users subscribed
CleverPush.getInstance(this).setIgnoreDisabledNotificationPermission(true)
Subscribe / Unsubscribe
public class MainActivity extends Activity {
  public void onCreate(Bundle savedInstanceState) {
    // last parameter (autoRegister) is false
    CleverPush.getInstance(this).init(..., false);

    // subscribe
    CleverPush.getInstance(this).subscribe();

    // subscribe with success / failure callback
    CleverPush.getInstance(this).subscribe(new SubscribedCallbackListener() {
      @Override
      public void onSuccess(String subscriptionId) {
        System.out.println("CleverPush Subscription ID: " + subscriptionId);
      }

      @Override
      public void onFailure(Throwable exception) {
        System.out.println("Error while subscribing: " + exception.getLocalizedMessage());
      }
    });

    // or unsubscribe
    CleverPush.getInstance(this).unsubscribe();

    // get subscription status (true or false)
    CleverPush.getInstance(this).isSubscribed();

    // get subscription id
    String subscriptionId = CleverPush.getInstance(this).getSubscriptionId(this);
  }
}
class MainActivity:Activity() {
  fun onCreate(savedInstanceState:Bundle) {
    // last parameter (autoRegister) is false
    CleverPush.getInstance(this).init(..., false)

    // subscribe
    CleverPush.getInstance(this).subscribe()

    // subscribe with success / failure callback
    CleverPush.getInstance(this).subscribe(object : SubscribedCallbackListener {
      override fun onSuccess(subscriptionId: String) {
        println("CleverPush Subscription ID: $subscriptionId")
      }

      override fun onFailure(exception: Throwable) {
        println("Error while subscribing: ${exception.localizedMessage}")
      }
    })

    // or unsubscribe
    CleverPush.getInstance(this).unsubscribe()

    // get subscription status (true or false)
    CleverPush.getInstance(this).isSubscribed()

     // get subscription id
     val subscriptionId: String? = CleverPush.getInstance(this).getSubscriptionId(this)
  }
}
Mark/Unmark Subscription As Test
You can mark or unmark a subscription as a test subscription.
Mark Subscription As Test
(Available from version 1.35.26)
Marks the current subscription as a test subscription.
Call this method after CleverPush has been initialized and a subscription ID is available.
// Mark subscription as test
CleverPush.getInstance(this).markSubscriptionAsTest();

// Mark subscription as test with success/failure callback
CleverPush.getInstance(this).markSubscriptionAsTest(new CompletionFailureListener() {
    @Override
    public void onComplete() {
        System.out.println("Marked subscription as test successfully");
    }

    @Override
    public void onFailure(Exception exception) {
        System.out.println("Error while marking subscription as test: " + exception.getLocalizedMessage());
    }
});
// Mark subscription as test
CleverPush.getInstance(this).markSubscriptionAsTest()

// Mark subscription as test with success/failure callback
CleverPush.getInstance(this).markSubscriptionAsTest(object : CompletionFailureListener {
    override fun onComplete() {
        println("Marked subscription as test successfully")
    }

    override fun onFailure(exception: Exception) {
        println("Error while marking subscription as test: ${exception.localizedMessage}")
    }
})
Unmark Subscription As Test
(Available from version 1.35.30)
To unmark a subscription as test. Removes the test status from the current subscription.
Call this method after CleverPush has been initialized and a subscription ID is available.
// Unmark subscription as test
CleverPush.getInstance(this).unmarkSubscriptionAsTest();

// Unmark subscription as test with success/failure callback
CleverPush.getInstance(this).unmarkSubscriptionAsTest(new CompletionFailureListener() {
    @Override
    public void onComplete() {
        System.out.println("Unmarked subscription as test successfully");
    }

    @Override
    public void onFailure(Exception exception) {
        System.out.println("Error while unmarking subscription as test: " + exception.getLocalizedMessage());
    }
});
// Unmark subscription as test
CleverPush.getInstance(this).unmarkSubscriptionAsTest()

// Unmark subscription as test with success/failure callback
CleverPush.getInstance(this).unmarkSubscriptionAsTest(object : CompletionFailureListener {
    override fun onComplete() {
        println("Unmarked subscription as test successfully")
    }

    override fun onFailure(exception: Exception) {
        println("Error while unmarking subscription as test: ${exception.localizedMessage}")
    }
})
Keep Trageting Data On Unsubscribe
(Available from version 1.23.5)
By default, the SDK automatically removes the following data from local storage when a user unsubscribes: Subscription ID, Topics, Tags, Attributes
The default value of keepTargetingDataOnUnsubscribe is false.
Set keepTargetingDataOnUnsubscribe to true to retain user targeting data locally even after the user unsubscribes.
This ensures that Topics, Tags, and Attributes are preserved locally, even when the user is no longer subscribed.
The subscriptionId is always removed and is not controlled by this flag.
On every Unsubscribe() call, the SDK removes: Subscription ID, Related sync/created fields
When keepTargetingDataOnUnsubscribe is enabled (true), the SDK keeps only: Topics, Topic version, Tags, Attributes
CleverPush.getInstance(this).setKeepTargetingDataOnUnsubscribe(true);
CleverPush.getInstance(this).setKeepTargetingDataOnUnsubscribe(true)
Get Device Token
You can retrieve the current device token (used for push notifications) with the following method:
CleverPush.getInstance(this).getDeviceToken(new DeviceTokenListener() {
    @Override
    public void complete(String deviceToken) {
        System.out.println("Device Token: " + deviceToken);
    }
});
CleverPush.getInstance(this).getDeviceToken(object : DeviceTokenListener {
    override fun complete(deviceToken: String) {
        println("Device Token: $deviceToken")
    }
})
Tags
Update tags from Dashboard → SDK:
If the Sync tags to client on subscription sync (App) option is enabled under Dashboard → General Settings → Advanced Settings, you can add or remove tags directly from the dashboard using the Subscription ID.
Any changes made in the dashboard will automatically sync with the SDK during the next subscription sync (syncSubscription).
By default, the SDK performs an automatic sync every 3 days. If you want the updated tags to be reflected in the SDK immediately, you can manually trigger a sync by calling the subscribe() method.
Update tags from SDK → Dashboard:
You can also manage subscription tags directly from the SDK. Changes made in the SDK will be synced to the dashboard automatically.
// Retrieve all available tags
CleverPush.getInstance(this).getAvailableTags(tags -> {
   // returns Set<ChannelTag>
});

// Get all subscribed tagIds
Set<String> subscribedTagIds = CleverPush.getInstance(this).getSubscriptionTags();

// Add a single tag
CleverPush.getInstance(this).addSubscriptionTag("TAG_ID");

// Add a single tag with success/failure callback
CleverPush.getInstance(this).addSubscriptionTag(
    "TAG_ID",
    new CompletionFailureListener() {
        @Override
        public void onComplete() {
            System.out.println("Subscription tag added successfully");
        }

        @Override
        public void onFailure(Exception exception) {
            System.out.println("Error while adding subscription tag: " + exception.getLocalizedMessage());
        }
    }
);

// Add multiple tags
CleverPush.getInstance(this).addSubscriptionTags(new String[] {"TAG_ID_1", "TAG_ID_2"});

// Remove a single tag
CleverPush.getInstance(this).removeSubscriptionTag("TAG_ID");

// Remove a single tag with success/failure callback
CleverPush.getInstance(this).removeSubscriptionTag(
    "TAG_ID",
    new CompletionFailureListener() {
        @Override
        public void onComplete() {
            System.out.println("Subscription tag removed successfully");
        }

        @Override
        public void onFailure(Exception exception) {
            System.out.println("Error while removing subscription tag: " + exception.getLocalizedMessage());
        }
    }
);

// Remove multiple tags
CleverPush.getInstance(this).removeSubscriptionTags(new String[] {"TAG_ID_1", "TAG_ID_2"});

// Check if subscription has a specific tag
boolean hasTag = CleverPush.getInstance(this).hasSubscriptionTag("TAG_ID");
// Retrieve all available tags
CleverPush.getInstance(this).getAvailableTags { tags ->
    // returns Set<ChannelTag>
}

// Get all subscribed tagIds
val subscribedTagIds = CleverPush.getInstance(this).getSubscriptionTags()

// Add a single tag
CleverPush.getInstance(this).addSubscriptionTag("TAG_ID")

// Add a single tag with success/failure callback
CleverPush.getInstance(this).addSubscriptionTag(
    "TAG_ID",
    object : CompletionFailureListener {
        override fun onComplete() {
            println("Subscription tag added successfully")
        }

        override fun onFailure(exception: Exception) {
            println("Error while adding subscription tag: ${exception.localizedMessage}")
        }
    }
)

// Add multiple tags
CleverPush.getInstance(this).addSubscriptionTags(arrayOf("TAG_ID_1", "TAG_ID_2"))

// Remove a single tag
CleverPush.getInstance(this).removeSubscriptionTag("TAG_ID")

// Remove a single tag with success/failure callback
CleverPush.getInstance(this).removeSubscriptionTag(
    "TAG_ID",
    object : CompletionFailureListener {
        override fun onComplete() {
            println("Subscription tag removed successfully")
        }

        override fun onFailure(exception: Exception) {
            println("Error while removing subscription tag: ${exception.localizedMessage}")
        }
    }
)

// Remove multiple tags
CleverPush.getInstance(this).removeSubscriptionTags(arrayOf("TAG_ID_1", "TAG_ID_2"))

// Check if subscription has a specific tag
val hasTag = CleverPush.getInstance(this).hasSubscriptionTag("TAG_ID")
Automatic Tag Assignment
The SDK can also automatically assign tags by using the trackPageView method. In simple cases you can just give the method a URL. In the CleverPush backoffice you can then set trigger the tags by matching URL Pathname RegExes. You can optionally also set combinations of min. visits, seconds or sessions for this tag.
Let's say you have created a tag with the URL pathname regex "/sports". This would trigger the tag for a subscriber:
CleverPush.getInstance(this).trackPageView("https://example.com/sports/article-123123");
CleverPush.getInstance(this).trackPageView("https://example.com/sports/article-123123")
We can also have more advanced use cases here by using Javascript functions for matching. For example you created a tag with the following function in the CleverPush backend: params.category === "sports". This would then trigger the tag for a subscriber:
CleverPush.getInstance(this).trackPageView("https://example.com/anything", new HashMap<String, String>() {{
   put("category", "sports");
}});
CleverPush.getInstance(this).trackPageView("https://example.com/anything", hashMapOf(
  "category" to "sports"
))
Once the trackPageView method has been implemented you can set up all the tags dynamically in the CleverPush backend without touching your code.
Automatic View Tracking
The SDK can also automatically track view by using the autoTrackWebViewPages and setWebViewClientListener methods.
autoTrackWebViewPages
You just need to add autoTrackWebViewPages to your webview clients doUpdateVisitedHistory method like below
new WebViewClient() {
    @Override
    public void doUpdateVisitedHistory(WebView view, String url, boolean isReload) {
        cleverPush.autoTrackWebViewPages(url);
        super.doUpdateVisitedHistory(view, url, isReload);
    }
}
object : WebViewClient() {
    override fun doUpdateVisitedHistory(view: WebView, url: String, isReload: Boolean) {
        CleverPush.getInstance(view.context).autoTrackWebViewPages(url)
        super.doUpdateVisitedHistory(view, url, isReload)
    }
}
setWebViewClientListener
You can set a setWebViewClientListener it will do Automatic View Tracking and you will get all the callback of WebViewClient in Listener :
CleverPush.getInstance(this).setWebViewClientListner(webView, new WebViewClientListener() {
   // ...
}
CleverPush.getInstance(this).setWebViewClientListener(webView, object : WebViewClientListener {
    // ...
})
Attributes
// Retrieve all available attributes
CleverPush.getInstance(this).getAvailableAttributes(attributes -> {
   // returns Set<CustomAttribute>
});

// Get all subscription attributes
Map<String, Object> subscriptionAttributes = CleverPush.getInstance(this).getSubscriptionAttributes();

// Get a single subscription attribute value
Object attributeValue = CleverPush.getInstance(this).getSubscriptionAttribute("user_id");

// Set a string value
CleverPush.getInstance(this).setSubscriptionAttribute("user_id", "1");

// Please provide dates in the following format: YYYY-MM-DD
CleverPush.getInstance(this).setSubscriptionAttribute("birthdate", "YYYY-MM-DD");

// Set an array of strings
String[] array = {"1", "2", "3"};
CleverPush.getInstance(this).setSubscriptionAttribute("user_id", array);

// Set multiple key-value pairs
Map<String, String> attributes = new HashMap<>();
attributes.put("user_id", "1");
attributes.put("zip", "20097");
CleverPush.getInstance(this).setSubscriptionAttributes(attributes);

// Remove a single attribute
CleverPush.getInstance(this).removeSubscriptionAttribute("user_id");

// Remove multiple attributes
CleverPush.getInstance(this).removeSubscriptionAttributes(new String[] {"user_id", "zip"});

// Remove a single attribute with success/failure callback
CleverPush.getInstance(this).removeSubscriptionAttribute(
    "user_id",
    new CompletionFailureListener() {
        @Override
        public void onComplete() {
            System.out.println("Attribute removed successfully");
        }

        @Override
        public void onFailure(Exception exception) {
            System.out.println(
                "Error while removing subscription attribute: "
                + exception.getLocalizedMessage()
            );
        }
    }
);
// Retrieve all available attributes
CleverPush.getInstance(this).getAvailableAttributes { attributes ->
    // returns Set<CustomAttribute>
}

// Get all subscription attributes
val subscriptionAttributes = CleverPush.getInstance(this).getSubscriptionAttributes()

// Get a single subscription attribute value
val attributeValue = CleverPush.getInstance(this).getSubscriptionAttribute("user_id")

// Set a string value
CleverPush.getInstance(this).setSubscriptionAttribute("user_id", "1")

// Please provide dates in the following format: YYYY-MM-DD
CleverPush.getInstance(this).setSubscriptionAttribute("birthdate", "YYYY-MM-DD")

// Set an array of strings
val array = arrayOf("1", "2", "3")
CleverPush.getInstance(this).setSubscriptionAttribute("user_id", array)

// Set multiple key-value pairs
val attributes = HashMap<String, String>()
attributes["user_id"] = "1"
attributes["zip"] = "20097"
CleverPush.getInstance(this).setSubscriptionAttributes(attributes)

// Remove a single attribute
CleverPush.getInstance(this).removeSubscriptionAttribute("user_id")

// Remove multiple attributes
CleverPush.getInstance(this).removeSubscriptionAttributes(arrayOf("user_id", "zip"))

// Remove a single attribute with success/failure callback
CleverPush.getInstance(this).removeSubscriptionAttribute(
    "user_id",
    object : CompletionFailureListener {
        override fun onComplete() {
            println("Attribute removed successfully")
        }

        override fun onFailure(exception: Exception) {
            println(
                "Error while removing subscription attribute: ${exception.localizedMessage}"
            )
        }
    }
)
You can also push/pull values to special array attributes (e.g. "categories").
CleverPush.getInstance(this).pushSubscriptionAttributeValue("categories", "category_1");

CleverPush.getInstance(this).pullSubscriptionAttributeValue("categories", "category_1");
CleverPush.getInstance(this).pushSubscriptionAttributeValue("categories", "category_1")

CleverPush.getInstance(this).pullSubscriptionAttributeValue("categories", "category_1")
Country & Language
You can optionally override the country & language which is automatically detected from the system and can be used for targeting / translations.
CleverPush.getInstance(this).setSubscriptionLanguage("en");
CleverPush.getInstance(this).setSubscriptionCountry("US");
CleverPush.getInstance(this).setSubscriptionLanguage("en")
CleverPush.getInstance(this).setSubscriptionCountry("US")
Topics
// Add a single topic
CleverPush.getInstance(this).addSubscriptionTopic("TOPIC_ID");

// Add a single topic with completion callback
CleverPush.getInstance(MainActivity.this).addSubscriptionTopic("TOPIC_ID", new CompletionListener() {
    @Override
    public void onComplete() {
        // Topic subscribed successfully
    }
});

// Add a single topic with success or failure callback
CleverPush.getInstance(MainActivity.this).addSubscriptionTopic("TOPIC_ID", new CompletionFailureListener() {
    @Override
    public void onComplete() {
        // Topic subscribed successfully
    }

    @Override
    public void onFailure(Exception exception) {
        // Error while subscribing to topic
    }
});

// Retrieve all available topics
CleverPush.getInstance(this).getAvailableTopics(topics -> {
   // returns Set<ChannelTopic>
});

// Get subscribed topics
Set<String> subscribedTopicIds = CleverPush.getInstance(this).getSubscriptionTopics();

CleverPush.getInstance(this).setSubscriptionTopics(new String[]{"ID_1", "ID_2"});

// Check if a topic is subscribed
boolean hasTopic = CleverPush.getInstance(this).hasSubscriptionTopic("TOPIC_ID");

// Let the user choose topics via dialog
CleverPush.getInstance(this).showTopicsDialog();

// Listen for topic changes
CleverPush.getInstance(this).setTopicsChangedListener(new TopicsChangedListener() {
    @Override
    public void topicsChanged(Set<String> topicIds) {

    }
});
// Add a single topic
CleverPush.getInstance(this).addSubscriptionTopic("TOPIC_ID")

// Add a single topic with completion callback
CleverPush.getInstance(this).addSubscriptionTopic(
    "TOPIC_ID",
    object : CompletionListener {
        override fun onComplete() {
            // Topic subscribed successfully
        }
    }
)

// Add a single topic with success or failure callback
CleverPush.getInstance(this).addSubscriptionTopic(
    "TOPIC_ID",
    object : CompletionFailureListener {
        override fun onComplete() {
            // Topic subscribed successfully
        }

        override fun onFailure(exception: Exception) {
            // Error while subscribing to topic
        }
    }
)

// Retrieve all available topics
CleverPush.getInstance(this).getAvailableTopics { topics ->
    // returns Set<ChannelTopic>
}

// Get subscribed topic IDs
val subscribedTopicIds = CleverPush.getInstance(this).getSubscriptionTopics()

CleverPush.getInstance(this).setSubscriptionTopics(arrayOf("TOPIC_ID_1", "TOPIC_ID_2"))

// Check if a topic is subscribed
val hasTopic = CleverPush.getInstance(this).hasSubscriptionTopic("TOPIC_ID")

// Let the user choose topics via dialog
CleverPush.getInstance(this).showTopicsDialog()

// Listen for topic changes
CleverPush.getInstance(this).setTopicsChangedListener(object : TopicsChangedListener {
    override fun topicsChanged(topicIds: Set<String>) {
        // Called when subscribed topics change
    }
})
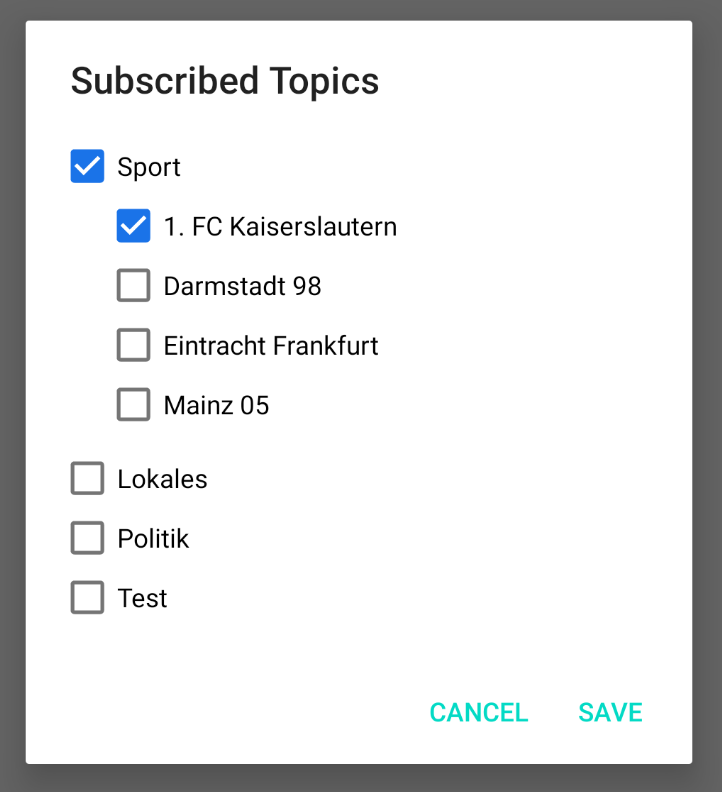
Here is how the topics dialog looks like:
Received Notifications
// Get the locally stored notification.
Set<Notification> notificationList = CleverPush.getInstance(this).getNotifications();
// Get the locally stored notifications
val notificationList = CleverPush.getInstance(this).notifications
// Get locally stored notifications via callback
CleverPush.getInstance(this).getNotifications(new NotificationsCallbackListener() {
    @Override
    public void ready(Set<Notification> notifications) {
        // handle notifications here
    }
});
// Get locally stored notifications via callback
CleverPush.getInstance(this)
    .getNotifications(object : NotificationsCallbackListener {
        override fun ready(notifications: Set<Notification>) {
            // handle notifications here
        }
    })
// Get remote notifications or local notifications based on the boolean argument.
// - Pass `true` to get the list of remote notifications.
// - Pass `false` to get the locally stored notifications.
CleverPush.getInstance(this).getNotifications(true, new NotificationsCallbackListener() {
    @Override
    public void ready(Set<Notification> notifications) {
      // handle notifications
    }
});
// Get remote notifications or local notifications based on the boolean argument.
// - Pass `true` to get the list of remote notifications.
// - Pass `false` to get the locally stored notifications.
CleverPush.getInstance(this).getNotifications(true) { notifications ->
    // handle notifications
}
Tracking Notification Clicks
(Available from version 1.35.5)
You can use the trackInboxClicked() method from the Notification class to manually track clicks on notifications retrieved either from local storage or remotely.
This is especially useful if you're displaying a custom inbox UI.
Set<Notification> notificationList = CleverPush.getInstance(this).getNotifications();

for (Notification notification : notificationList) {
    // Track an notification click
    notification.trackInboxClicked();
}

CleverPush.getInstance(this).getNotifications(true, new NotificationsCallbackListener() {
    @Override
    public void ready(Set<Notification> notifications) {
        for (Notification notification : notifications) {
            // Track an notification click
            notification.trackInboxClicked();
        }
    }
});
val notificationList = CleverPush.getInstance(this).notifications

notificationList.forEach { notification ->
    notification.trackInboxClicked()
}

CleverPush.getInstance(this).getNotifications(true) { notifications ->
    notifications.forEach { notification ->
        notification.trackInboxClicked()
    }
}
Remove Notification
Remove a notification stored locally
You can remove a notification from local storage using its notification ID:
CleverPush.getInstance(this).removeNotification("Notification ID");
CleverPush.getInstance(this).removeNotification("Notification ID")
Remove a notification from local storage and the notification center
You can remove a notification from both local storage and the notification center by setting removeFromNotificationCenter to true:
CleverPush.getInstance(this).removeNotification("Notification ID", true);
CleverPush.getInstance(this).removeNotification("Notification ID", true)
Remove all notifications from local storage
(Available from version 1.35.23)
You can remove all notifications stored locally using the following method (this does not clear any notifications from notification center):
CleverPush.getInstance(this).removeAllNotifications();
CleverPush.getInstance(this).removeAllNotifications()
Notification Styles
CleverPush automatically chooses the fitting Notification Style for you (e.g. BigImageStyle or BigTextStyle). We also provide a way that you can choose the displayed Notification style:
// Available Notification styles:
CleverPush.NotificationStyle.AUTO // default style
CleverPush.NotificationStyle.BIG_TEXT // big text style
CleverPush.NotificationStyle.BIG_PICTURE // big picture style
CleverPush.NotificationStyle.TEXT_WITH_IMAGE // custom style with big image and text in expanded view

CleverPush.getInstance(this).setNotificationStyle(CleverPush.NotificationStyle.AUTO);
// Available Notification styles:
CleverPush.NotificationStyle.AUTO // default style
CleverPush.NotificationStyle.BIG_TEXT // big text style
CleverPush.NotificationStyle.BIG_PICTURE // big picture style
CleverPush.NotificationStyle.TEXT_WITH_IMAGE // custom style with big image and text in expanded view

CleverPush.getInstance(this).setNotificationStyle(CleverPush.NotificationStyle.AUTO)
App Banners
(Available from version 1.8.0)
// Will be called, once a user presses a button in the banner
CleverPush.getInstance(this).setAppBannerOpenedListener(action -> {
   System.out.println("App Banner Opened");
});

// You can also show one banner by its ID (we recommend app banner events for production usage)
CleverPush.getInstance(this).showAppBanner("BANNER_ID");
// Will be called, once a user presses a button in the banner
CleverPush.getInstance(this).setAppBannerOpenedListener({ action-> println("App Banner Opened") })

// You can also show one banner by its ID (we recommend app banner events for production usage)
CleverPush.getInstance(this).showAppBanner("BANNER_ID")
(Available from version 1.34.36)
// You can show one banner by its ID and listen when it is closed (we recommend app banner events for production usage)
CleverPush.getInstance(this).showAppBanner("BANNER_ID", new AppBannerClosedListener() {
    @Override
    public void closed() {
        System.out.println("App banner is closed.");
    }
});
// You can show one banner by its ID and listen when it is closed (we recommend app banner events for production usage)
CleverPush.getInstance(this).showAppBanner("BANNER_ID", AppBannerClosedListener {
    println("App banner is closed.")
})
Get banners by group ID
CleverPush.getInstance(this).getAppBannersByGroup((Collection<Banner> banners) -> {
    for (Banner banner : banners) {
      System.out.println(banner.getId());
    }
},
groupId);
CleverPush.getInstance(this).getAppBannersByGroup({ banners: Collection<Banner> ->
    for (banner in banners) {
        println(banner.id)
    }
}, groupId)
Custom Fonts for App Banners
You can also set a custom fonts to banner's text and button
You can apply custom fonts to the banner text and buttons to match your app’s branding.
Supported Font Formats
The following font formats are supported:
- .ttf — TrueType
- .otf — OpenType
Uploading / Adding Font Files
You can place the font files in any one of the following locations:
Option A: Resource fonts (recommended)
app/src/main/res/font/
or
app/src/main/res/fonts/
Option B: Assets
app/src/main/assets/
app/src/main/assets/font/
app/src/main/assets/fonts/
📄 Note: Only
.ttfand.otffiles are supported.
![]()
Referencing the Font in Configuration
When configuring the banner:
- Use the font file name without the extension
- Do not include .ttf or .otf
Example If your font file is:
playwrite_norge.ttf
Use this value in the configuration:
playwrite_norge
![]()
Fallback Behavior
If the custom font:
- Is missing,
- Has an incorrect name, or
- Fails to load for any reason,
the SDK will automatically fall back to the default system font, ensuring the banner remains readable and functional.
Custom activity
You can also set a custom activity, which will then be used to display the app banners:
CleverPush.getInstance(this).setCustomActivity(activity);
CleverPush.getInstance(this).setCustomActivity(activity)
Disabling/Enabling App Banners
App banners are enabled by default.
You can temporarily disable app banners, for example during a splash screen or while navigating between screens.
If a banner is triggered while banners are disabled, it will be added to an internal queue and automatically displayed once enableAppBanners() is called.
CleverPush.getInstance(this).disableAppBanners();
CleverPush.getInstance(this).enableAppBanners();
CleverPush.getInstance(this).disableAppBanners()
CleverPush.getInstance(this).enableAppBanners()
Non-blocking banners
(Available from version 1.35.28)
By default, app banners block user interaction with the app while they are visible. You can allow users to interact with the app while an in-app banner is displayed by enabling the non-blocking mode.
Call this before initializing the SDK
CleverPush.getInstance(this).setAppBannersNonBlocking(true);
CleverPush.getInstance(this).setAppBannersNonBlocking(true)
To restore the default blocking behaviour:
CleverPush.getInstance(this).setAppBannersNonBlocking(false);
CleverPush.getInstance(this).setAppBannersNonBlocking(false)
Development mode
You can enable Development Mode to temporarily disable app banner caching.
This ensures that you always see the most up-to-date version of app banners during development and testing.
CleverPush.getInstance(this).enableDevelopmentMode();
CleverPush.getInstance(this).enableDevelopmentMode()
HTML Banners
CleverPush supports various JavaScript functions which can be called from HTML banners:
CleverPush.subscribe();
CleverPush.unsubscribe();
CleverPush.closeBanner();
CleverPush.trackEvent(eventId, propertiesObject);
CleverPush.trackClick(buttonId);
CleverPush.trackClick(buttonId, customDataObject);
CleverPush.openWebView(url);
CleverPush.setSubscriptionAttribute(attributeId, value);
var attributeValue = CleverPush.getSubscriptionAttribute('attributeId');
CleverPush.addSubscriptionTag(tagId);
CleverPush.removeSubscriptionTag(tagId);
CleverPush.setSubscriptionTopics(topicIds);
CleverPush.addSubscriptionTopic(topicId);
CleverPush.removeSubscriptionTopic(topicId);
CleverPush.showTopicsDialog();
CleverPush.goToScreen('screenId');
CleverPush.nextScreen();
CleverPush.previousScreen();
CleverPush.copyToClipboard('text');
CleverPush.handleLinkBySystem('mailto:example@email.com'); // support multiple link types, including `mailto:`, `tel:`, `market/Play Store`, and standard `http/https` links.
Event Tracking
Events can be used to track conversions or trigger app banners.
CleverPush.getInstance(this).trackEvent("EVENT NAME");

// track an event with custom properties
CleverPush.getInstance(this).trackEvent("EVENT NAME", new HashMap<String, Object>() {{
    put("property_1", "value");
}});

// track an event with a specified amount
CleverPush.getInstance(this).trackEvent("EVENT NAME", 37.50f);
CleverPush.getInstance(this).trackEvent("EVENT NAME")

// track an event with custom properties
CleverPush.getInstance(this).trackEvent("EVENT NAME", hashMapOf(
    "property_1" to "value"
))

// track a conversion with a specified amount
CleverPush.getInstance(this).trackEvent("EVENT NAME", 37.50f)
Follow up Events
Deprecated: Use trackEvent instead to trigger Follow-ups via Events.
Events can be used to trigger follow-up campaigns.
CleverPush.getInstance(this).triggerFollowUpEvent("EVENT NAME");

// add custom parameters
CleverPush.getInstance(this).triggerFollowUpEvent("EVENT NAME", new HashMap<String, String>() {{
  put("id", "123456");
}});
CleverPush.getInstance(this).triggerFollowUpEvent("EVENT NAME")

// add custom parameters
CleverPush.getInstance(this).triggerFollowUpEvent("EVENT NAME", hashMapOf("id" to "123456"))
Tracking Consent
You can optionally require a tracking consent from the user (e.g. you get this consent from a CMP). If you tell our SDK to wait for the tracking consent, it will not call any tracking-related features until the consent is available. Calls will be queued and automatically executed until the consent is available.
Step 1: Call this before initializing the SDK:
CleverPush.getInstance(this).setTrackingConsentRequired(true);
CleverPush.getInstance(this).setTrackingConsentRequired(true)
Step 2: Call this when the user gave his consent (needs to be called on every launch):
CleverPush.getInstance(this).setTrackingConsent(true);
CleverPush.getInstance(this).setTrackingConsent(true)
Subscribe Consent
You can optionally require user consent for subscription (e.g., obtained through a CMP). If you tell our SDK to wait for the subscribe consent, it will not call subscribe features until the consent is available. Calls will be queued and automatically executed once consent is granted.
Step 1: Call this before initializing the SDK:
CleverPush.getInstance(this).setSubscribeConsentRequired(true);
CleverPush.getInstance(this).setSubscribeConsentRequired(true)
Step 2: Call this when the user gave his consent (needs to be called on every launch):
CleverPush.getInstance(this).setSubscribeConsent(true);
CleverPush.getInstance(this).setSubscribeConsent(true)
Geo Fencing
For using Geo Fencing you need to request the location permission from the user.
CleverPush.getInstance(this).requestLocationPermission();
CleverPush.getInstance(this).requestLocationPermission()
You can also check at any time if the user has already granted the permission:
boolean hasPermission = CleverPush.getInstance(this).hasLocationPermission();
val hasPermission: Boolean = CleverPush.getInstance(this).hasLocationPermission()
Authorization Token
(Available from version 1.31.13)
You can set an authorization token that will be used in an API call.
CleverPush.getInstance(this).setAuthorizerToken("YOUR_AUTH_TOKEN_HERE");
CleverPush.getInstance(this).setAuthorizerToken("YOUR_AUTH_TOKEN_HERE")
TCF2 CMP
(Available from version 1.32.0)
You can set IabTcfMode. Perform subscribe or tracking according to IabTcfMode if vendor consent is 1.
Call this before initializing the SDK
/** IabTcfModes are
IabTcfMode.SUBSCRIBE_WAIT_FOR_CONSENT,
IabTcfMode.TRACKING_WAIT_FOR_CONSENT,
IabTcfMode.DISABLED
*/
CleverPush.getInstance(this).setIabTcfMode(IabTcfMode.SUBSCRIBE_WAIT_FOR_CONSENT);
/** IabTcfModes are
IabTcfMode.SUBSCRIBE_WAIT_FOR_CONSENT,
IabTcfMode.TRACKING_WAIT_FOR_CONSENT,
IabTcfMode.DISABLED
*/
CleverPush.getInstance(this).setIabTcfMode(IabTcfMode.SUBSCRIBE_WAIT_FOR_CONSENT)
Auto Request Notification Permission
(Available from version 1.32.2)
You can diable the notification permission dialog while subscribe.
Default autoRequestNotificationPermission value is true so while subscribing it checks that if notification permission is not given then it will display the dialog. By seting autoRequestNotificationPermission value to false notification permission dialog will not display if permission is not given while subscribe.
CleverPush.getInstance(this).setAutoRequestNotificationPermission(false);
CleverPush.getInstance(this).setAutoRequestNotificationPermission(false)
Auto Resubscribe
(Available from version 1.32.2)
You can perform auto resubscribe whenever app open if the user has given notification permission and subscriptionId is null.
Default autoResubscribe value is false. By seting autoResubscribe value to true whenever app open it checks that the user has given notification permission and subscriptionId is null then perform subscribe.
CleverPush.getInstance(this).setAutoResubscribe(true);
CleverPush.getInstance(this).setAutoResubscribe(true)
Set Local Track Event Retention Days
(Available from version 1.33.0)
App Banners: Targeting by events from previous sessions
Added the Add Event feature in the Targeting section in the app banner. Where you can set the last x days event called and fulfil the specific condition then the banner will display.
E.g in last 5 days between from 5 to 10 event TEST. It will store the banner event data in a local database and check from the current date to till next five days. If the event called count for that particular banner is between 5 to 10 or not. If it's between those values then the banner will display otherwise not. After 5 days banner will not display.
To delete the local database's table entry need to set trackEventRetentionDays. The default days are 90 days. It will check each record's createdDateTime, if it's greater than trackEventRetentionDays then that data will be deleted from the table.
Call this before initializing the SDK
CleverPush.getInstance(this).setLocalTrackEventRetentionDays(20);
CleverPush.getInstance(this).setLocalTrackEventRetentionDays(20)
Set Custom Notification Activity Enabled
(Available from version 1.34.18)
The setCustomNotificationActivityEnabled method allows to enable launching a custom activity when a notification is opened.
By default, the customNotificationActivityEnabled value is set to false. To enable this functionality, set the value to true and call it within the NotificationOpenedListener.
Call this in NotificationOpenedListener
CleverPush.getInstance(context).init(
    getString(R.string.channel_id),
    new NotificationReceivedListener() {
        @Override
        public void notificationReceived(NotificationOpenedResult result) {
            System.out.println("Received CleverPush Notification: " + result.getNotification().getTitle());
        }
    },
    new NotificationOpenedListener() {
        @Override
        public void notificationOpened(NotificationOpenedResult result) {
            if (result != null && result.getNotification().getUrl() != null) {
                String url = result.getNotification().getUrl();
                deepLinkUri = Uri.parse(url);
                try {
                    CleverPush.getInstance(this).setCustomNotificationActivityEnabled(true);

                    Intent intent = new Intent(getApplicationContext(), NotificationActivity.class);
                    intent.setFlags(Intent.FLAG_ACTIVITY_NEW_TASK);
                    intent.setAction(Intent.ACTION_VIEW);
                    intent.setData(deepLinkUri);
                    intent.addCategory(Intent.CATEGORY_APP_BROWSER);
                    intent.addCategory(Intent.CATEGORY_DEFAULT);
                    startActivity(intent);
                } catch (ActivityNotFoundException e) {
                    Logger.e("CleverPush", "createNotificationOpenedListener error: " + e, e);
                }
            } else {
                Logger.w("CleverPush", "initializeCleverPush Couldn't extract url from notification.");
            }
        }
    },
    new SubscribedListener() {
        @Override
        public void subscribed(String subscriptionId) {
            // Implement subscription logic here if needed
        }
    },
    autoRegister
);
CleverPush.getInstance(this).setCustomNotificationActivityEnabled(true)
Piano Segments
(Available from version 1.35.29)
You can set and retrieve Piano segments for a subscription.
Set Piano Segments
The setPianoSegments method allows you to sync Piano segments to a subscription.
CleverPush.getInstance(this).setPianoSegments(new String[] {"PIANO_SEGMENT_ID_1", "PIANO_SEGMENT_ID_2"});
CleverPush.getInstance(this).setPianoSegments(arrayOf("PIANO_SEGMENT_ID_1", "TAGPIANO_SEGMENT_ID_2_ID_2"))
Get Piano Segments
The getSubscriptionPianoSegments method returns the Piano segments associated with the current subscription.
Set<String> pianoSements = CleverPush.getInstance(this).getSubscriptionPianoSegments();
val pianoSements = CleverPush.getInstance(this).getSubscriptionPianoSegments()